Showing posts with label Baby Quilt. Show all posts

Wednesday, March 2, 2022

Baby Quilt for Parker

 My latest baby quilt was for my niece, Taylor, and her husband as they get ready for the arrival of their first baby—A GIRL!!  When I asked for nursery information, Taylor messaged a couple of pictures and I immediately knew that my stash had exactly what would become the perfect quilt.  Does anyone else drool over a collection, purchase it and then horde it because the perfect project hasn’t been inspired yet??


The soft, muted palette in this collection was going to make the best quilt for this baby!  Next was to decide on a design!  As I sat at my computer, using the software for quilt designing by the Electric Quilt Company, a snowball block came to mind in order to feature the beautiful prints. An arrow block could fill the alternating block with a more “geometric” shape.  Wanting to have her name personalized on the quilt also turned my direction into a “strip” or row quilt layout using 12” blocks. 

What do you think???

Check back for Part 2….

Always in Stitches,

Renee


Tuesday, November 18, 2014

Baby Quilt Tutorial-Quilt Sandwich

Making a quilt sandwich is similar to building a sandwich in the kitchen.  A top and bottom additional layers in between held together with condiments.  In our case, the "condiments" will be adhesive spray and/or safety pins.

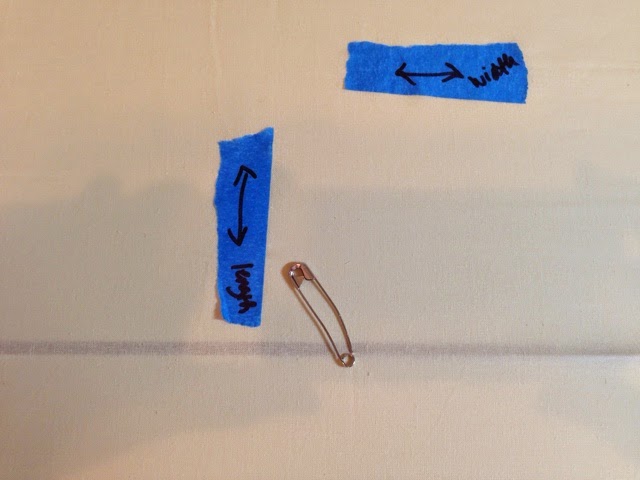
Clean off a cutting table or floor so you can spread the quilt out right side down.  This step is like laying your bottom piece of bread down to get ready to build your sandwich.  I like to fold my backing in half lengthwise and then crosswise to make a point and find the center.  Mark through one layer of fabric with a safety pin.  I also like to use painter's tape with arrows drawn on it to show my length and width.  (This is handy when layering a large quilt such as a king in my sample but not as pertinent with a baby size)

Then spread your backing out RIGHT SIDE DOWN and if on a table, secure with binder clips (find them at your local office supply store) or if on the floor (ouch my knees and back) secure with painter's tape around the edges.

Repeat the folding process with the batting and quilt top to find the center.  Our batting is the next layer in our QUILT SANDWICH!  I like to use adhesive spray to keep my layers nice and smooth.  Typically I use what I can get at my local craft store using my iphone coupons!   Match up your batting center with your backing center, making sure your width and length are both going the same directions! Remove the pin and tape from the backing layer and spray with a little adhesive spray and begin smoothing from the center to the edges.  Take the binder clips off and reattach them including the batting or tape the batting layer to the floor.


Repeat this process with the quilt top (the final top piece to our QUILT SANDWICH-again, I didn't have pictures of the baby quilt in this process, so this is a different quilt!)  Remember to spray lightly with the adhesive spray, smooth to edges beginning at center and then re-clip or tape.
Now the FUN part....safety pins
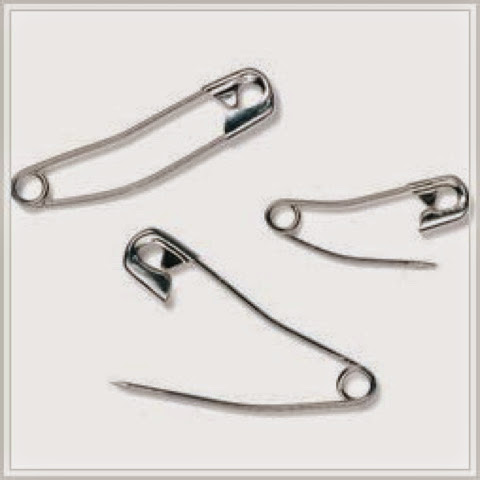
I like to use curved basting pins and willingly pay the extra for them.  They save the fingernails and fingers when trying to close them with the quilt sandwich layers firmly secured to either the floor or table.  

They come in a variety of sizes and can be purchased at most craft/fabric stores and online.  There is even a handy tool to save the fingers if you so desire!
This part of the process is time consuming but most necessary to have smooth quilt layers.  Beginning in the center of the quilt, pin safety pins through all the layers, smoothing and pinning your way to the edge. Pin every 4-6 " until the entire quilt sandwich is full of pins, securing the layers together (much like your toothpick with the colored cellophane in your deli sandwich).  

When you are completely finished pinning, you may remove the binder clips or tape and you are ready to quilt the layers together.  (*another note on my picture---I had pre-quilted my blocks, thus the stitching--yours will be plain)

Be careful pinning!  Watch those fingers!
My favorite sandwich is a BLT and a quilt sandwich....what about you?

Pin away!
Renee


P.S.All tutorials, information and images are the property of Renee Galloway at Ney Ney's Nest and are intended for personal use only.  Feel free to re-blog, pin, share with attribution to Ney Ney's Nest.  For all other purposes, please contact me at reneegalloway@me.com.  Thanks!


Monday, November 17, 2014

Baby Quilt Tutorial-Quilt By Machine

In this tutorial, we will machine quilt our "sandwiched" quilt that we assembled in the prior blog on how to assemble a quilt sandwich. 

  This technique works best with a walking foot.  This particular presser foot helps feed the layers over the dog feet (the zig-zag like treads under the presser foot).  It can only go forward and backward and is typically only used for directional lines and stitching in the ditch.  (perhaps another tutorial?)

Another technique to quilt on the machine is free motion quilting.  This technique uses a darning or open toed presser foot. The dog feet are dropped out of the way and the quilt sandwich is moved with your hands to create intricate and creative designs!  I'm just beginning to try this technique.  

Lastly is a technique using the normal foot and machine stitches programmed into your machine.  Stippling, zig-zag, curves, shells, etc are all designs that can be used as is or modified to create quilting lines to hold your sandwiched layers together.  This photo is demonstrating an "S" stitch that I elongated to quilt the plaid sections of the baby quilt.  The painter's tape (I use a LOT of painter's tape in my studio!!!) is a method to keep me lined up properly without having to mark the quilt and wash the marks out.  Just stitch a line, measure and quilt, move it and start again!

It is best to start quilting from the center of the quilt and move outward in quadrants.  The purpose behind this rule of thumb is to smooth the layers from the middle to the outside edges.  Creeping can occur (and is normal) of the layers as the presser foot feeds them through the machine.  That is why I included the "grace" (see other Baby quilt tutorials) on all the edges.

I also like to vary my patterns.  On the elephant print I did a straight stitch set on the diagonal.  The plaid got a wavy stitch and the chevron I followed the zig-zag of the fabric.  
 
This is the backing I used-plaid is on the reverse.  Note that the waves aren't perfect!

Remember to have a new needle 90/14or 80/12, a full bobbin ( I hate to run out in the middle of a sewing sequence) and good thread.  (Perhaps another post?)


Happy stitching!
Renee


P.S.All tutorials, information and images are the property of Renee Galloway at Ney Ney's Nest and are intended for personal use only.  Feel free to re-blog, pin, share with attribution to Ney Ney's Nest.  For all other purposes, please contact me at reneegalloway@me.com.  Thanks!